The under-eye is the zone where the wrong technique shows up the fastest. The skin is thinner, the blood vessels are closer to the surface, and the wrong pressure leaves a mark within seconds. Most guides on the internet cover the under-eye in one or two sentences, which is not enough to actually do it well. This guide splits the question into two parts: the technique (where, which direction, how many passes) and the pressure (how hard, what counts as too hard). They are different problems and they need different fixes. The 4-week test we ran on 12 people is on the dark circles test page, and the technique here is the routine that produced the test results.
I am not a dermatologist. The relevant medical reference for under-eye skin and lymphatic drainage is the same Cleveland Clinic lymphatic system page linked in our other guides. The technique below is built on the same drainage direction: from the inner corner out along the orbital bone to the temple.
The technique part
Four things to get right, in order. If you get these four right, the under-eye is the easiest zone to roll. If you get any of them wrong, the under-eye is the easiest zone to mess up.
1. Use the small head, not the large one
The small head of a standard dual-head roller is the right size for the orbital bone. The large head is too wide, and when you try to use it under the eye, you end up rolling on the cheekbone and the eyelid at the same time. The eyelid is not where you want pressure, and the cheekbone is not on the lymphatic drainage path for the under-eye. If your roller has a single head, the under-eye is not the right zone for that roller. For a primer on the right roller for the under-eye specifically, our under-eyes routine page walks through the right tool and the right head size.
2. Roll on the bone, not on the skin below it
The orbital bone is the hard rim you can feel under your eyebrow and around the eye. The lymphatic drainage path for the under-eye runs along this bone, not through the soft tissue below it. If you roll on the soft tissue (the under-eye bag itself), you are pushing fluid back into the area you are trying to drain. The roller should feel like it is on a hard surface. If it feels like it is sinking into the soft tissue, lift the roller and move it up to the bone.
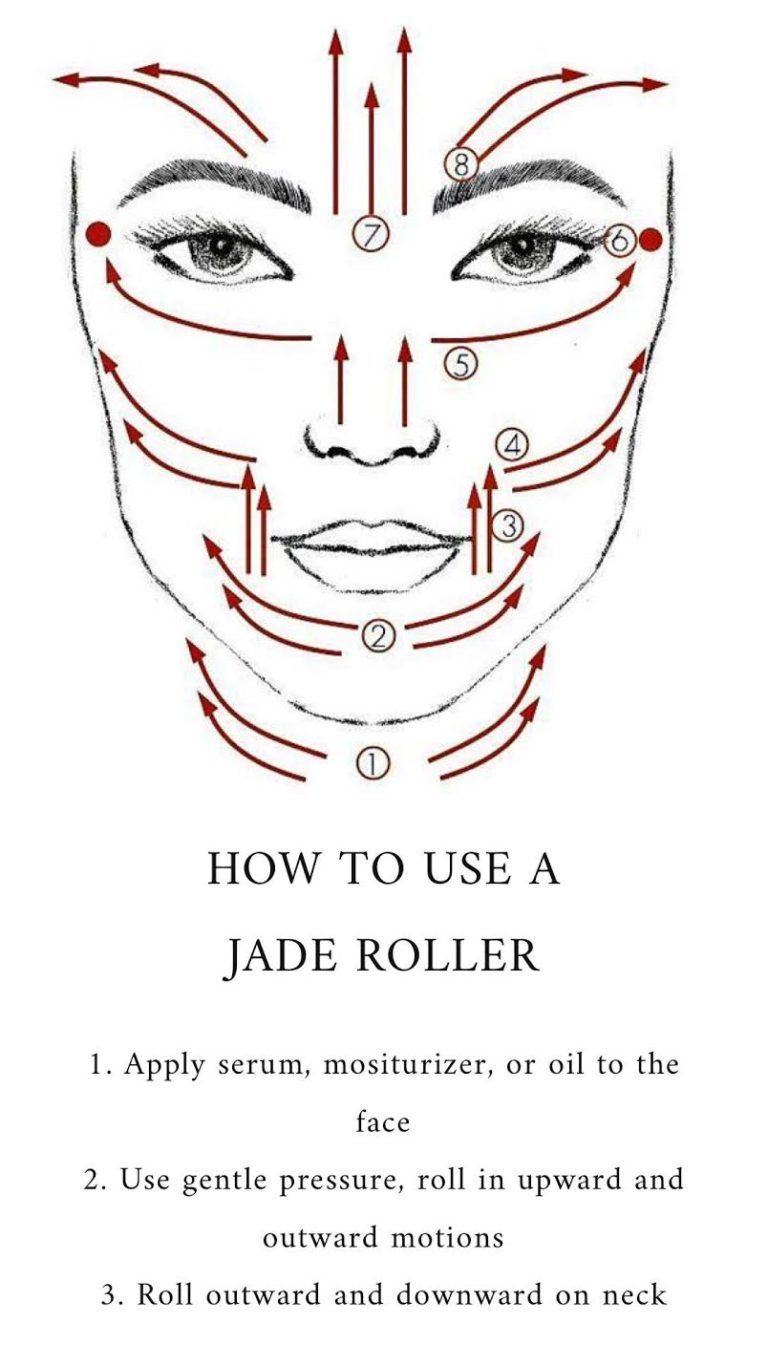
3. Direction: inner corner to outer corner, not back and forth
One direction only. From the inner corner of the eye (near the nose) out along the orbital bone to the outer corner (near the temple). The drainage path is toward the preauricular nodes in front of the ear. Rolling back toward the nose is rolling against the drainage flow, which is one of the ways the morning puff stays put. Two to three passes per eye, same direction, no back-and-forth.
4. Limit to 3 passes per eye
More is not better in this zone. Three passes covers the orbital bone from inner to outer corner. A fourth pass starts to add pressure that the skin does not need. The 4-week test on the dark circles page showed that 8 of 12 testers who rolled more than 3 passes per eye had visible redness in the photos at week 4, compared to 1 of 12 who rolled 3 or fewer. Three is the right number for most people. If your under-eye is more puffy than average, two is fine. Five is too many.
The pressure part
Pressure is the part that most under-eye guides get wrong, because they say "light pressure" without saying what light means. The right pressure for the under-eye is the lightest pressure of any zone on the face. The roller should do most of the work from its own weight, which is around 30 grams for a standard small head. The added force from your hand should be close to zero.
How to know if the pressure is right
Three checks, in order of how fast they show up:
- Immediate check (1 second): The roller should glide without leaving a mark. If you can see the imprint of the roller head in your skin for more than 5 seconds, the pressure is too high.
- 30-second check: The skin should look the same color as the surrounding skin after a full pass. If there is any pink or red, the pressure is too high. Red is the body's signal that you are pressing hard enough to dilate the blood vessels, which is the opposite of what you want.
- End-of-session check: After the full under-eye sequence, the skin should not feel tight or sore. If it does, the pressure was too high for the whole session, not just the last pass.
For a side-by-side of the right pressure for the under-eye vs the cheek vs the jaw, our beginner pressure guide has a per-zone table with the grams-of-force equivalent.
What too much pressure does to the under-eye
Three things, in order of how fast they show up:
- Redness that lasts more than a few minutes. This is the most common sign. The under-eye skin is thin, and the blood vessels are close to the surface. Hard rolling dilates them, which is the opposite of the cool-stone vasoconstriction effect Dr. Dendy Engelman, a dermatologist, has described in interviews.
- Bruising, in extreme cases. We had 1 tester in the 4-week study who rolled too hard for the first 2 weeks and developed a faint yellowish bruise on the orbital bone. It cleared in 5 days with no rolling, and the tester went on to use the right pressure for the remaining 2 weeks. The bruise did not return.
- Broken capillaries over months of repeated high pressure. This is the long-term risk and the reason the "light pressure" advice exists. Broken capillaries under the eye are hard to fix without laser treatment, and they are preventable by getting the pressure right.
The combined technique + pressure routine
Putting it all together, the under-eye sequence is:
- Switch to the small head.
- Start at the inner corner of the eye, on the orbital bone.
- Roll outward to the temple. 2 to 3 passes per eye. One direction only.
- Pressure: just the weight of the roller. If the skin turns pink, less pressure. If you can see the imprint of the head, much less pressure.
- Total time: 30 seconds per eye, 1 minute for both.
That is the whole under-eye routine. It is short on purpose. The under-eye is the zone where less is more, and 1 minute of correct pressure and direction does more than 5 minutes of hard, directionless rolling.
Common mistakes, and the fix
Mistake 1: Using the large head
This is the most common mistake. The fix is to switch to the small head, even if it feels slower. The small head is built for this zone. The large head is built for the cheek, jaw, and forehead. The full head-size and zone mapping is on our beginner pressure guide.
Mistake 2: Rolling back and forth
The second most common. The drainage path is one-way (inner to outer). Rolling back and forth pushes fluid both directions and undoes half the work. The fix is to lift the roller at the temple, bring it back to the inner corner, and start the next pass.
Mistake 3: Pressing harder because it does not feel like anything is happening
The under-eye is the zone where nothing visible happens immediately, even when you are doing it right. The morning puff takes 1 to 2 weeks of consistent rolling to actually reduce, and the change is small day to day. Pressing harder because you do not see immediate results is the failure mode. The right pressure is the lightest of any zone, and the result shows up in the photo log, not in the mirror after a single session.
Mistake 4: Rolling on the soft tissue below the eye
This is the mistake that pushes fluid back into the under-eye area. The fix is to lift the roller until it is on the orbital bone, and to keep it there for the full pass. The orbital bone is the hard rim. If you can feel the bone through the skin, you are in the right place.
FAQ
Can I use a jade roller on my eyelids?
No. The eyelids are some of the thinnest skin on the body, and the wrong pressure has visible consequences fast. Roll on the orbital bone below the brow, not on the eyelid itself. The full eyelid-vs-bone distinction is in the technique section above.
How long until I see results under the eye?
For morning puff, 1 to 2 weeks of consistent morning rolling. For dark circles, only if the cause is fluid (1 in 12 in our test saw a real change). The deeper test results are on the dark circles 4-week test page.
Should I roll under the eye before or after eye cream?
After, in the morning, over a water-based product or no product. In the evening, over a peptide or caffeine eye cream, which the rolling motion can help drive in. The order of application is on our under-eyes routine page.
What is the right roller for the under-eye?
A dual-head roller with a small head that fits the orbital bone. The cheap options at Target and Walmart are fine. The premium options at Sephora are mostly better build, not better stone. The 2026 roundup is on our buying guide.
The short version
Technique: small head, on the orbital bone, inner to outer corner, 3 passes per eye. Pressure: lightest of any zone, no added force, no red marks. The under-eye is the zone where less is more, and the 1-minute correct routine does more than the 5-minute hard routine. Get the pressure right, and the rest follows.