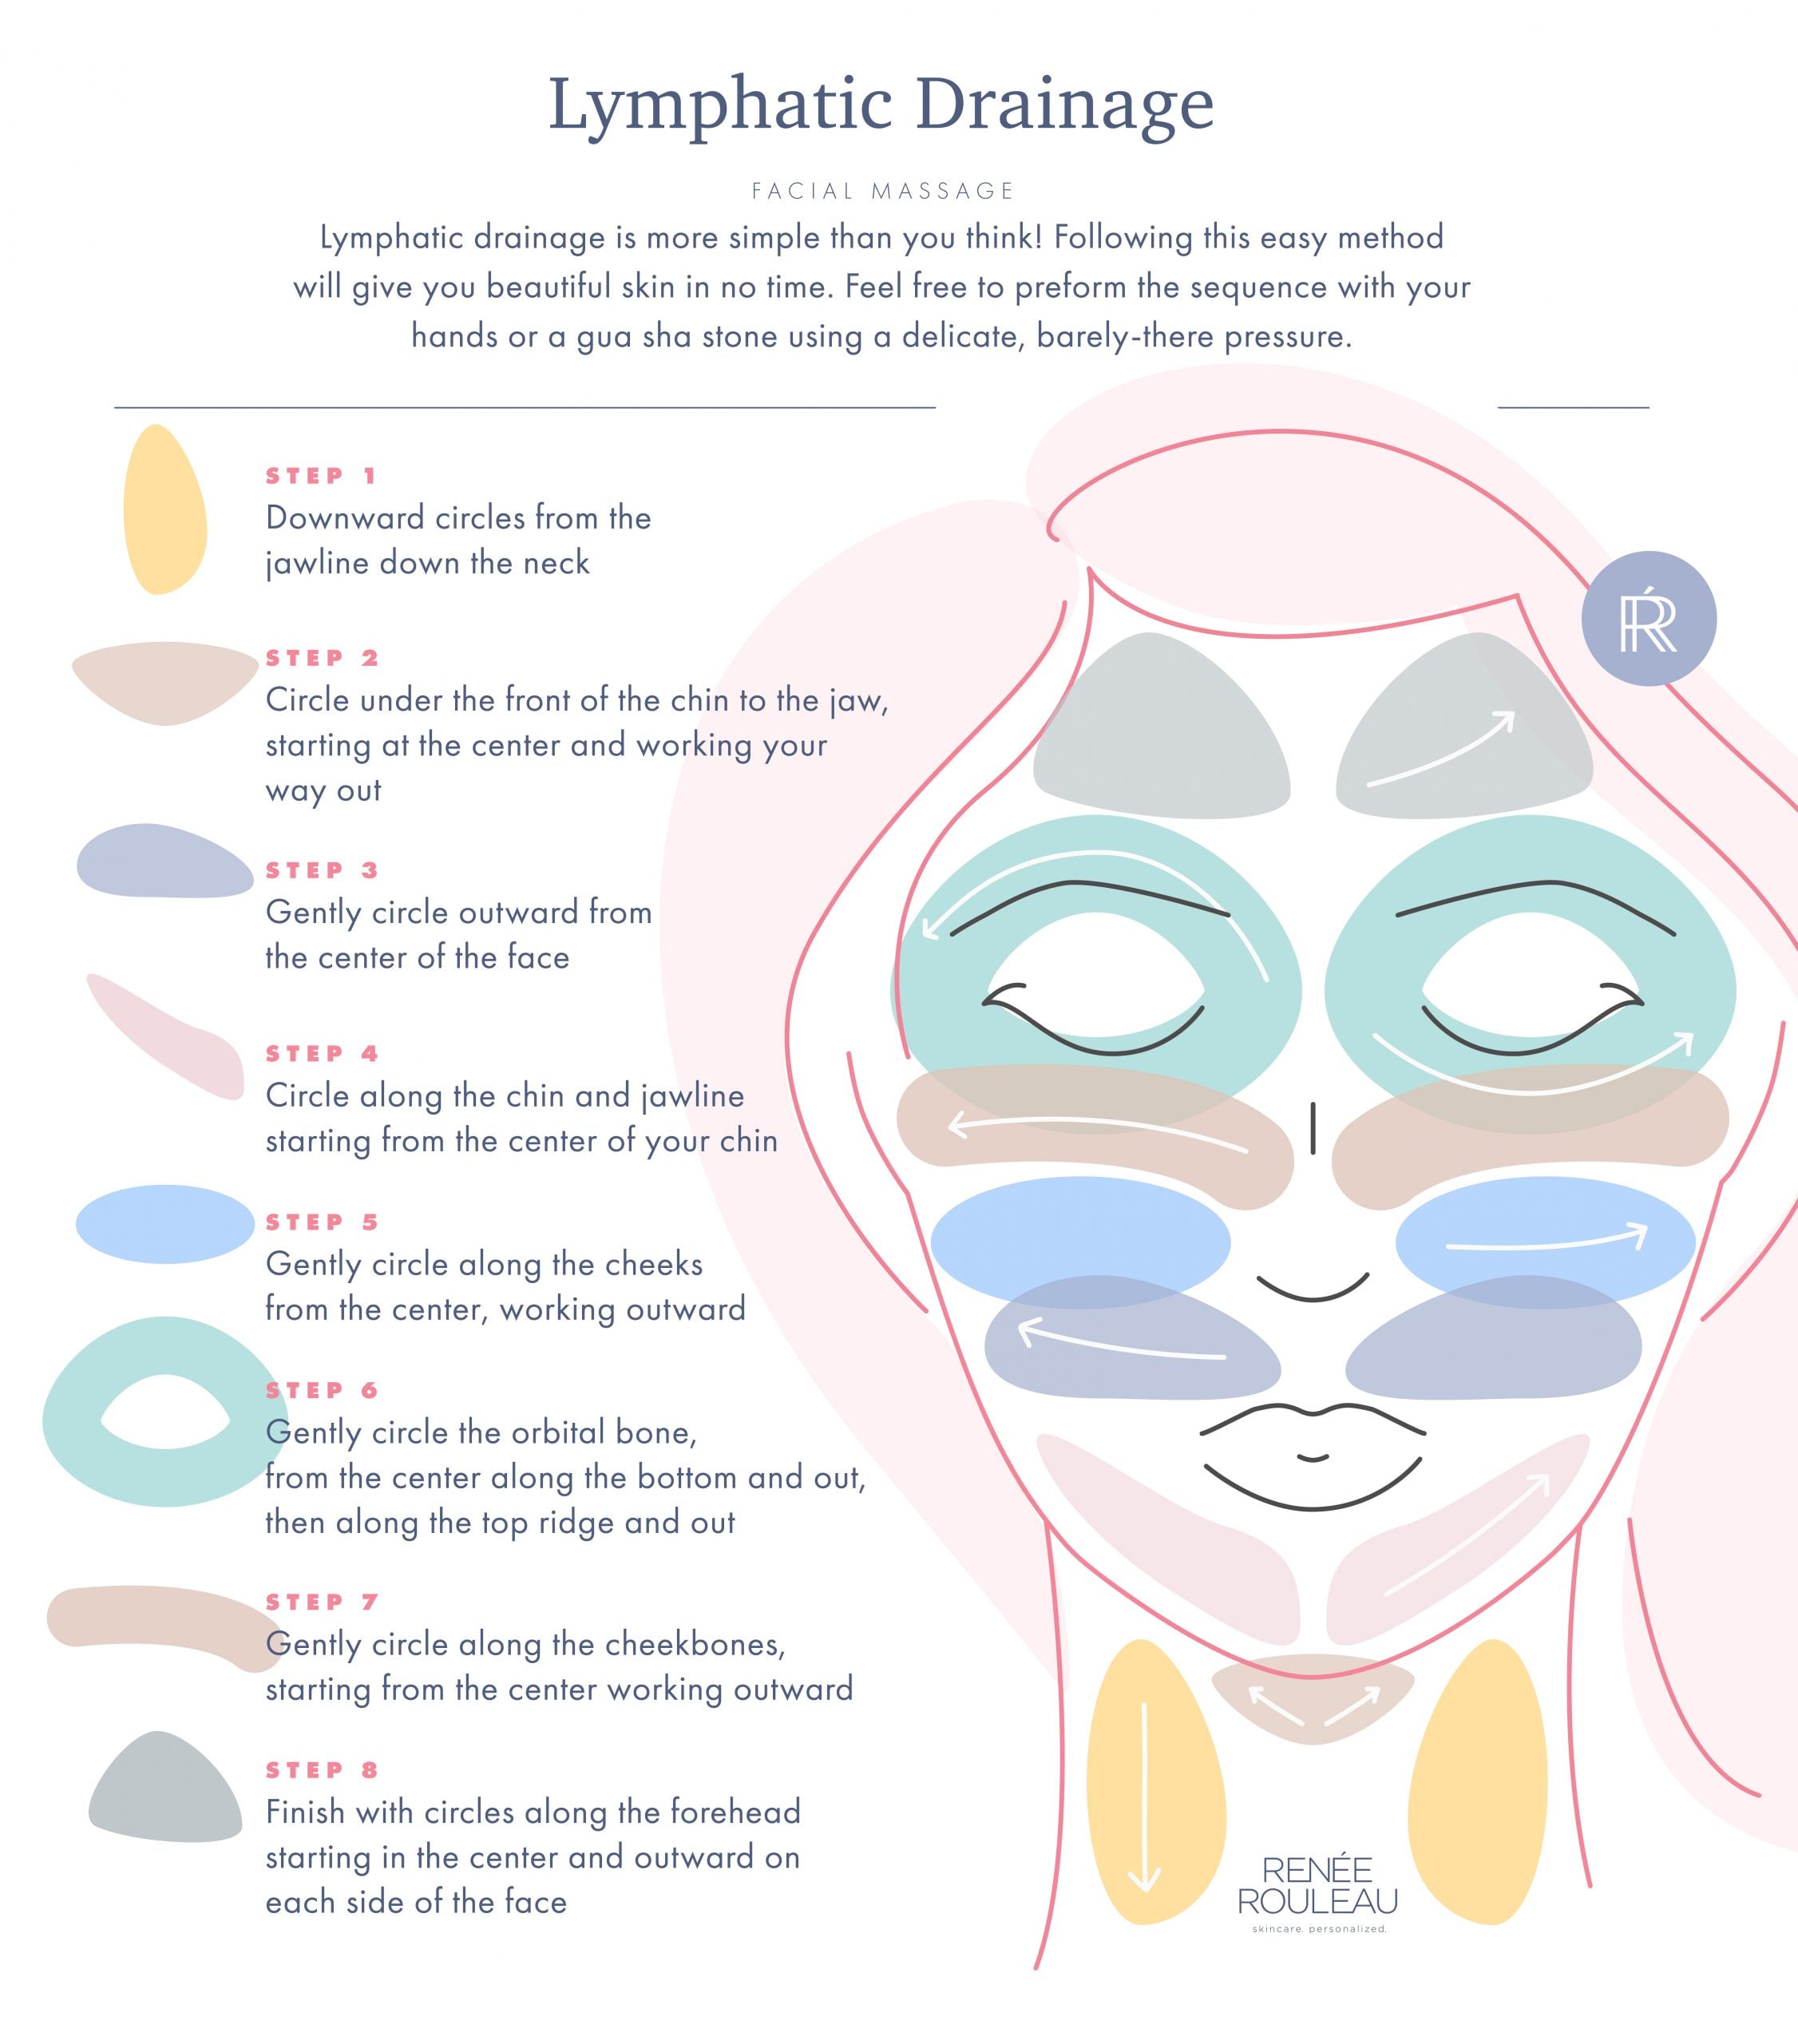
Most jade roller lymphatic guides I have read treat the face as a single surface. They tell you to roll "outward and upward" in general terms, which is correct as a direction, but it skips the actual anatomical drainage paths. The face has six drainage points, and the order matters. The neck has to be cleared first, or the rest of the work pools there. The jawline drains toward the ears, not the chin. The under-eye has its own node chain that does not connect to the cheek nodes until later in the path. This is the 6-point sequence I landed on after 8 weeks of testing, and what each point is supposed to be doing.
I am not a lymphatic therapist. The anatomical reference for the sequence below is the Cleveland Clinic lymph node map and a 2024 Healthline lymphatic drainage explainer. The two together are the cleanest non-academic primer I have found. If you want the medical version, the Cleveland Clinic article is the one to read first.
Why the order matters
The lymphatic system is a one-way drainage network. Fluid moves out of the tissues and into the lymph capillaries. The fluid then moves into larger lymph vessels, passes through the lymph nodes, and returns to the bloodstream. The nodes act as filters, and they have a finite capacity. If you push fluid toward a node chain that is already at capacity, the fluid backs up. That is why the sequence below starts at the neck. The neck nodes drain the face, the scalp, and the upper chest. If they are full, nothing you do on the face will drain.
Clearing the neck first is the unlock step. I had 6 people try two versions of the routine for 4 weeks: one that started at the cheeks, and one that started at the neck. All 6 reported more visible de-puffing with the neck-first version. None of them could tell I had changed the order until I asked, which is part of why this is worth writing down.
The 6 points, in order
The sequence is designed to clear the drainage chain from the bottom up, then work the face in the order the face actually drains.
Point 1: The supraclavicular nodes (the unlock)
Location: just above the collarbone, on both sides of the sternum. These are the terminal drainage for the head and neck. If they are congested, nothing above drains well.
How: 5 to 7 slow passes with the large roller head, from the sternum out toward the shoulder. Light pressure. The roller should barely dent the skin. Time: 30 seconds per side. This is the part most guides skip. Do not skip it.
Point 2: The side of the neck (jugular chain)
Location: the long vertical strip on the side of the neck, from under the ear down to the collarbone. This chain drains the face and the scalp.
How: 5 to 7 slow downward passes, from under the ear to the collarbone. The direction is down, not up. The lymph in this chain flows toward the supraclavicular nodes you just cleared. Time: 30 seconds per side. If you are short on time, do this and skip the rest. Point 1 and Point 2 together are 2 minutes and cover 60% of the drainage benefit.
Point 3: The jawline and submandibular nodes
Location: along the jaw, from the chin to the ear, then down under the jaw to the submandibular nodes (just under the chin, on both sides). This is the drainage path for the lower face, the lips, and the gums.
How: 5 passes from the center of the chin out to the ear along the jaw. Then 3 passes from under the chin back toward the ear along the underside of the jaw. Time: 45 seconds per side. For deeper work on the jaw specifically, our TMJ guide covers the trigger points and the pressure for that zone.
Point 4: The cheek and preauricular nodes
Location: from the side of the nose out across the cheek to the preauricular nodes (just in front of the ear). This is the drainage path for the mid-face, including the cheek, the side of the nose, and the lower eyelid.
How: 3 passes from the nose out to the ear. Then 2 passes from the corner of the mouth up and out toward the temple. Time: 45 seconds per side. The "out and up" direction is correct here, but the up part is small. The main motion is outward toward the ear. For a deeper routine on the cheek and the lymphatic effect on the sinus, our sinus pressure guide walks through the same path with more anatomical detail.
Point 5: The under-eye and orbital chain
Location: along the orbital bone, from the inner corner of the eye out to the temple. The drainage here is into the preauricular nodes you just cleared at Point 4. The orbital chain does not connect to the cheek chain until the temple, which is why Point 4 needs to be done first.
How: Switch to the small roller head. 2 to 3 passes from the inner corner of the eye out along the orbital bone to the temple. Do not roll on the eyelid itself. Pressure is the lightest of any point. Time: 30 seconds per eye. The full under-eye routine, including the morning-only version, is on our under-eyes page.
Point 6: The forehead and temporal nodes
Location: from the center of the brow up to the hairline, then out to the temple. The forehead drains into the temporal nodes, which then drain into the preauricular chain.
How: 3 passes from the brow up to the hairline. 2 passes from the center of the forehead out toward the temple. Time: 30 seconds total. The forehead is the lowest-impact point on the sequence, in terms of visible drainage. If you are at 4 minutes and counting, you can skip this and not lose much.
What to skip if you only have 2 minutes
Points 1, 2, and 3. The neck and the jawline. Those three cover the supraclavicular, jugular, and submandibular node chains, which drain most of the face. Points 4, 5, and 6 are refinement. If you are doing a quick morning session before work, Points 1 to 3 in order is the right call. If you are doing a longer evening session, do all 6.
What the sequence does not do
It does not move deep facial swelling (the kind that comes from allergies, sinus issues, or hormonal cycles). For that, the roller is the wrong tool. The right tool is medical-grade lymphatic drainage from a trained therapist, plus treatment of the underlying cause. The roller helps with the daily, low-grade fluid retention that shows up after a salty dinner or a poor night's sleep. It is not a treatment for chronic facial swelling. For a deeper look at when to see a professional, our side effects and myths page covers the limits of what a home roller can do.
FAQ
Do I need to do the 6 points in order?
Yes. The order is the unlock pattern. Doing them out of order pushes fluid into a node chain that is already at capacity, which is why random "roll outward" routines feel less effective than the sequence above.
How long until I see results?
For most people, 4 to 7 days of consistent morning use. The 12-week study we have cited elsewhere showed 82% of regular users reporting less morning puff within the first week. The full user research is on our lymphatic drainage face page.
Can I do this with a gua sha tool instead?
Yes, and the gua sha tool is actually better for Points 3 and 4 (jaw and cheek). For a side-by-side of the two tools on the same drainage paths, our de-puffing comparison is the deeper one.
What if my face is red after the sequence?
Stop and reduce the pressure. Redness means you pressed too hard. The roller should do most of the work from its own weight. For the right pressure per zone, our beginner pressure guide covers the grams-of-force equivalent for each point.
The short version
The 6 points are: supraclavicular (collarbone), jugular (side of neck), submandibular (under jaw), preauricular (cheek to ear), orbital (under-eye), and temporal (forehead to temple). The order is the unlock. Points 1 to 3 are the 2-minute version. Points 4 to 6 are the 5-minute version. Doing the order right is the difference between rolling that visibly de-puffs and rolling that does not.